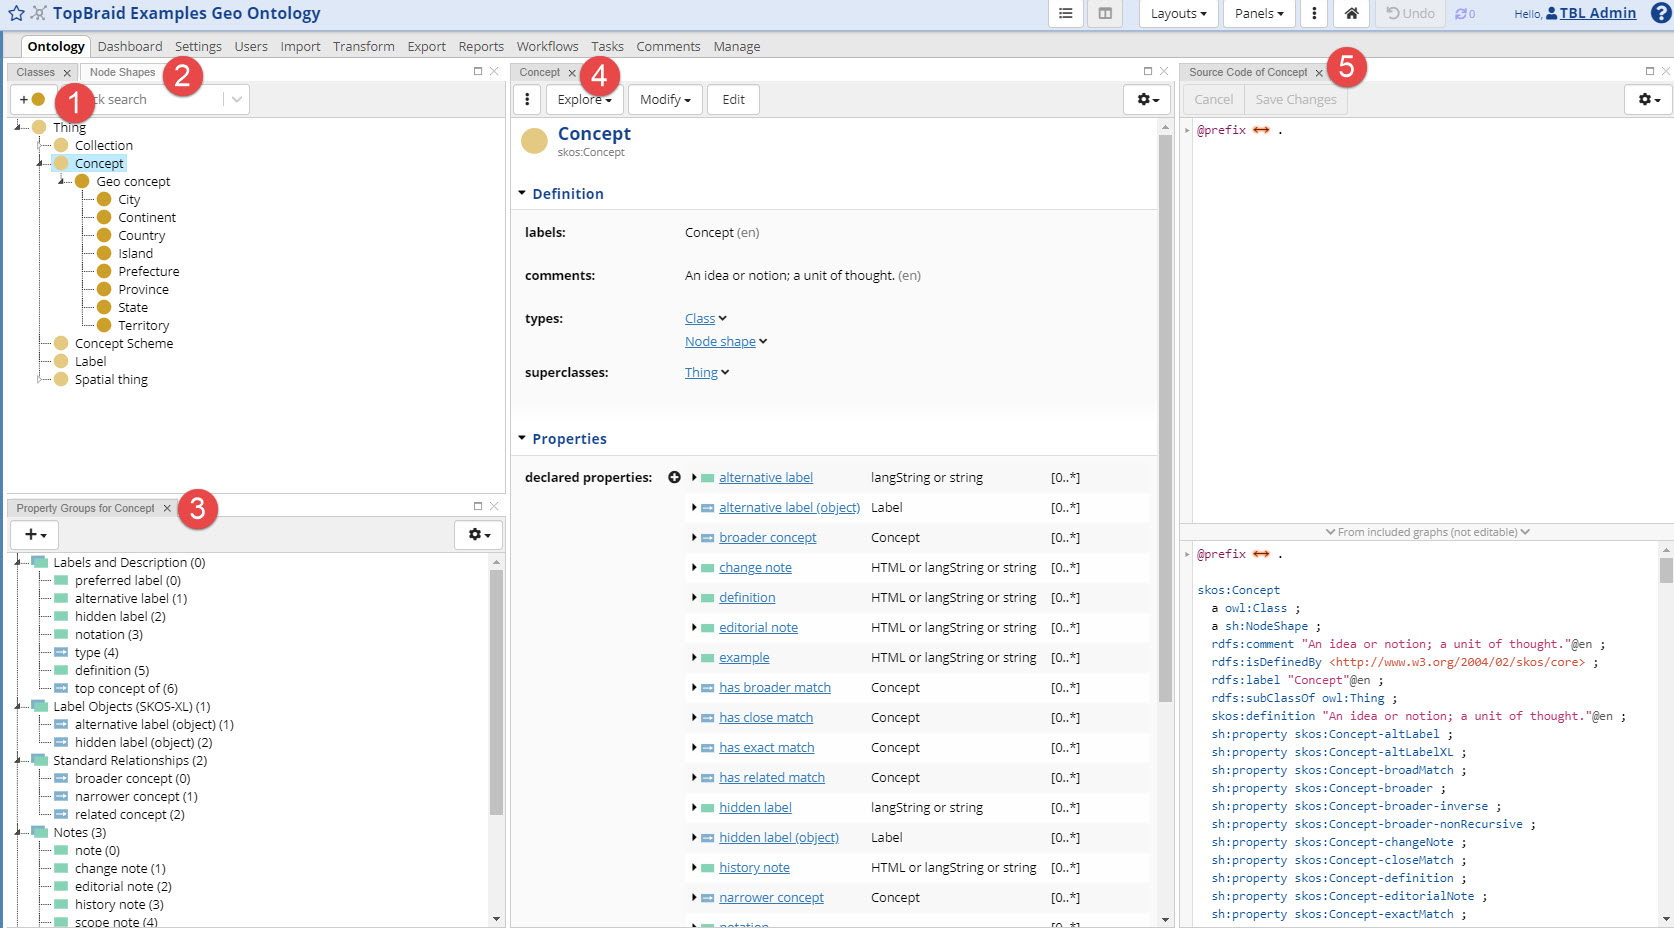
EDG collection editors are composed of panels.
The example below is the default view for ontologies.
Panels here are labeled 1-5. Just like the other collection editors, the UI for this editor can be customized and arranged and comes with many panels and layouts.
You can add schema panels to an editor for any asset collection, but you will only be able to perform edit operations in these panels if you are in an ontology.
If you are in an ontology and some of the editing operations are not available to you, check that you have editing permissions.
If you do, then a resource you have selected may be defined in an included ontology.
In this case, some of editing is not possible i.e., you can add new statements, but you can’t delete statements that are from the included ontology.
This panel displays hierarchy of classes starting with a selected root.
Hierarchical relationship between classes is rdfs:subClassOf.
You can re-arrange classes in the hierarchy by dragging and dropping.
In EDG, every asset is a member of at least one class.
Properties are associated with classes and a default view of the asset is determined by classes it belongs to.
Alternative views can be defined by node shapes that are not classes themselves but target members of a class.
By default, the root class in the Classes panel is set to Thing (owl:Thing).
There is a button in the header that lets you switch the root to Resource (rdfs:Resource) – this may be useful for system ontologies.
You can also set the root to any class of your choice via Manage > Root Class of Hierarchy.
This might be desired, for example, if your ontology specializes another ontology, and you don’t want to show the ancestor classes of your custom classes.
Replace the default class-name “Thing” with the name of the preferred root class.
Autocomplete will assist in entering the class-name.
Another option to modify what is shown in the tree is by using the Settings menu.
It lets you elect to show only local classes. This will display in the tree only classes defined in this ontology.
Classes from included ontologies will not be shown. Note, however, that if a non local class has local children, then because the non local class will not be shown in the tree, its local children will not be shown either – unless they have another parent that is local.
Classes panel has a quick search field.
It lets you look up classes displayed in the tree. The lookup is limited only to classes that are children of the currently selected root.
The icon to the right of the Quick search field will switch from autocomplete lookup based on the label to the full text search across all string properties.
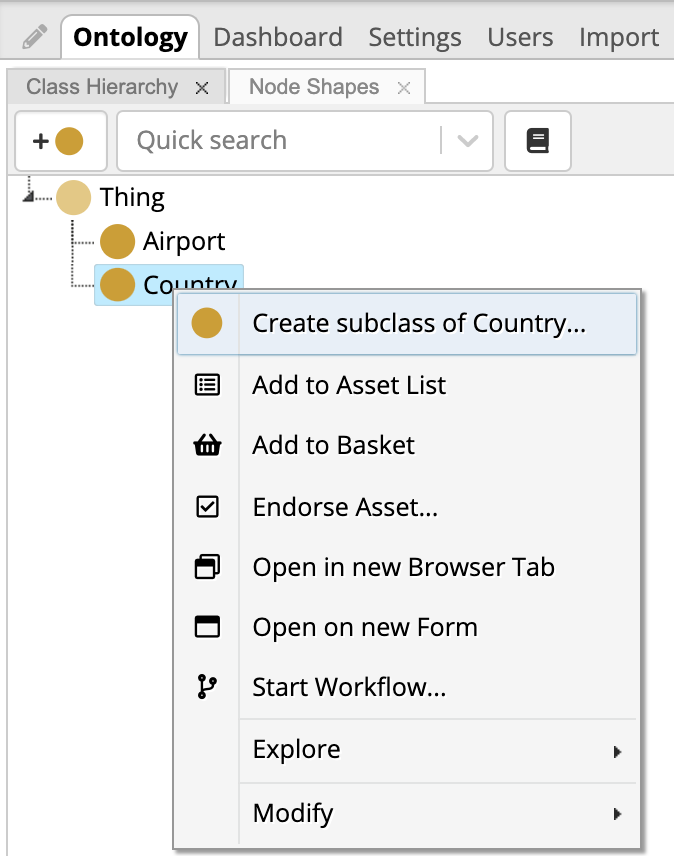
To create a new class, select the parent class and then click the Create Class… button.
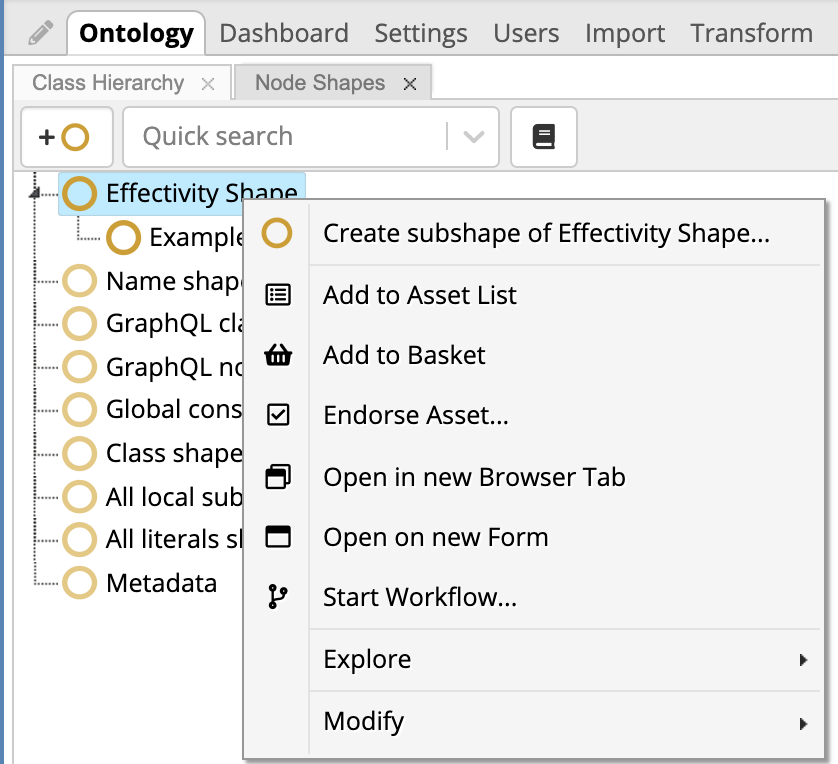
Or, alternatively, right click on the parent and select Create subclass of … :
EDG will display a dialog box where you enter the name of your new Class and optionally edit the URI generated by EDG as an internal ID for the class.
By default, EDG will automatically generate a URI to uniquely identify the resource by combining the default namespace specified for the ontology on its creation (the default being “http://example.org/ontologies/<asset collection name>#”) with a user-entered label for the resource, with any characters that would cause problems in a URI being converted.
For example, the URI generated for a class with the label “Nonprofit Organization” might be “http://example.org/ontologies/my_ontology#NonprofitOrganization”.
If the generated URI is non-unique, EDG will give you a message that resource already exists.
After you click the OK button, EDG adds the class to the hierarchy.
Note
Every new class will also be typed as a SHACL Node Shape.
If you have started by loading into EDG ontologies in RDFS/OWL, use Transform>Convert OWL Axioms to SHACL Constraints to generate SHACL Shapes.
This panel has no menu system in the header, instead actions are driven by right clicking on a class. It also has no settings menu.
Adds selected asset to a sharable asset list. Asset lists are available in the Creating and Using Asset Lists and used for bookmarking or bulk actions.
Basket (see Bookmarking Asset Collections and Assets) is similar to Asset List but for all of EDG.
It is located in the main header bar.
Here users can reate new versions of collection or bookmark assets or collections.
This is per user and not shared.
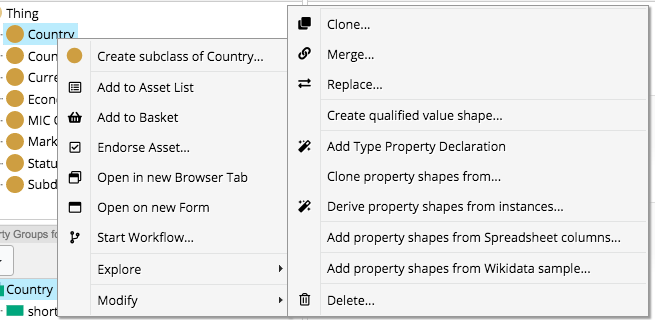
Clones the selected class.
All property shapes associated with the selected class will also be associated with the clone.
See Cloning and Replacing Assets for more details.
Allows users to select a class or a node shape from which to clone property shapes definitions.
You will be able to select the properties to clone.
Cloning creates copies of selected property shapes as blank nodes.
Only available if a class is also a node shape.
Allows users to select an asset collection that contains instance data for this class.
It will examine the data and automatically create property shapes based on the data values.
Only available if a class is also a node shape.
Allows users to select a spreadsheet to use as an indicative example from which to create property definitions.
Only available if a class is also a node shape.
Allows users to identify Wikidata resource to use as an indicative example from which to create property definitions.
You will be able to select properties you want to use and modify their cardinalities and datatypes.
New property shapes will be created as resources using the standard Class-property convention for URI creation.
Only available if a class is also a node shape.
After confirmation, deletes the selected class and some associated items.
Deleting a class will delete all its instances if they are present in the ontology.
Any property shapes will be deleted if they are identified using blank nodes.
Not available for classes included from another ontology.
After confirmation, deletes the selected class and all its subclasses, transitively.
This is not available for classes included from another ontology and is only available if a class has subclasses.
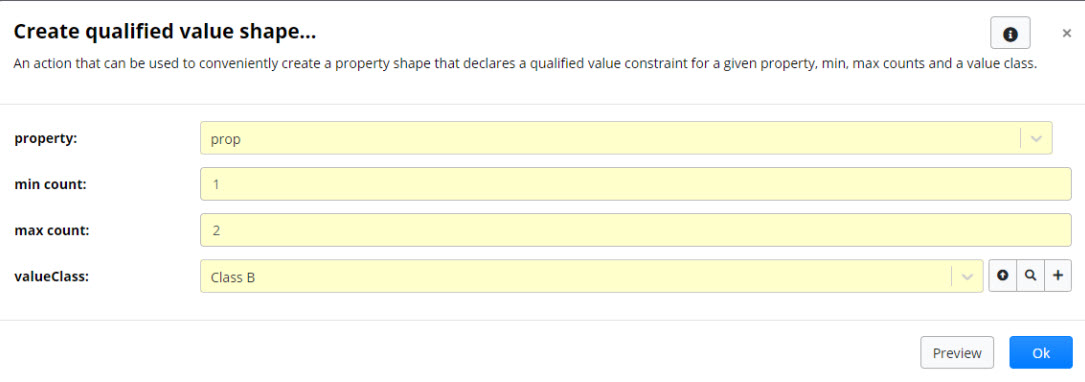
This features allow users to specify conditions that only a certain number of values of a given property must meet.
For example, at least 1 and no more than 2 values of “prop” property must be members of Class B, while other values of “prop” can be members of other classes.
While EDG will declare all new classes also as Node Shapes, it also supports creation of Node Shapes that are not classes.
This may be useful when creating an alternative view of class members or when creating a shape that will be used in other shapes, for example, as part of logical expressions.
Node Shapes panel displays ONLY node shapes that are not classes.
It also supports creation of such shapes. This means that in order for these shapes to be used with data, they must be targeted.
See W3C SHACL specification to understand targets https://www.w3.org/TR/shacl/#targets.
This panel can display hierarchy of node shapes.
Hierarchical relationship between node shapes is sh:node.
You can drag and drop node shapes to arrange them hierarchically.
Organizing a node shape under a parent means that all constraints defined for the parent apply to the child.
Node Shapes panel has a quick search field.
It lets you quickly look up node shapes of interest.
Lookup will only search for node shapes presented in this panel i.e., no classes.
The icon to the right of the Quick search field will switch from autocomplete lookup based on the label to the full text search across all string properties.
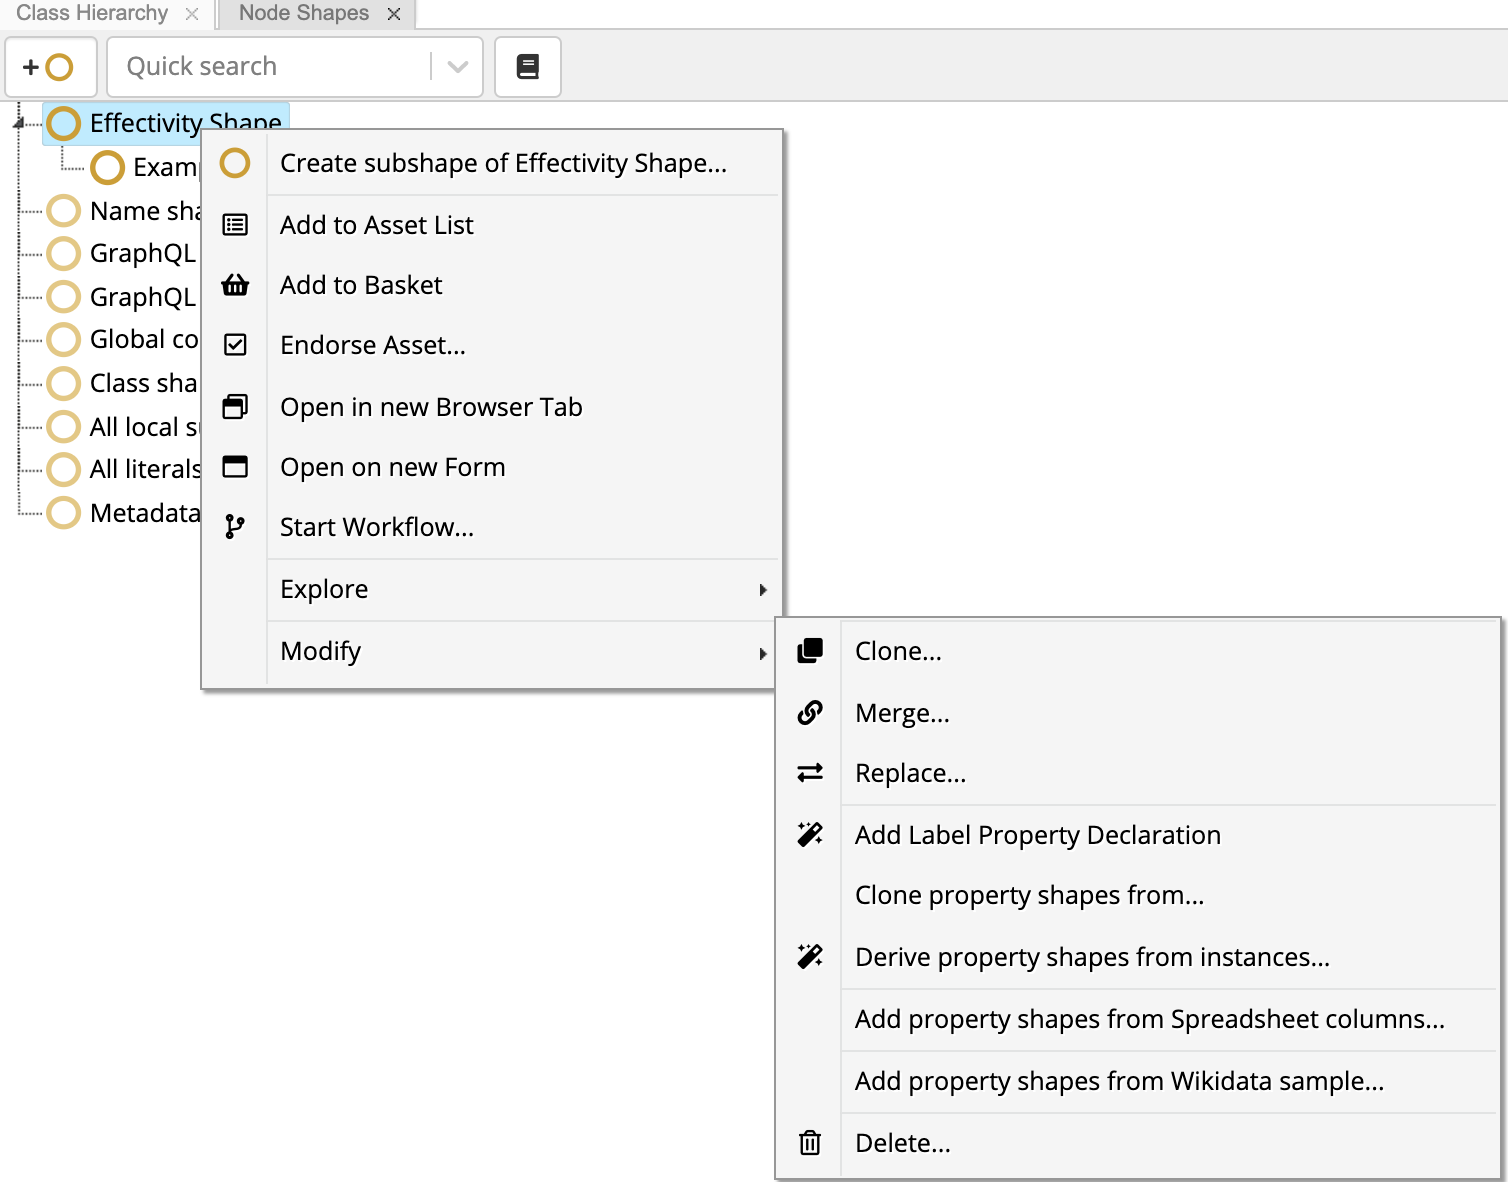
Right clicking on a Node Shape, in addition to create action, will give you access to Explore and Modify operations.
All operations are described below.
Clone … – will clone selected node shape.
All property shapes associated with it will also be associated with the clone.
Merge … – will remove the selected node shape and copy all its information into another, “merged into” shape.
Not available for node shapes included from another ontology.
Replace … – will replace selected node shape.
Not available for node shapes included from another ontology.
Add Label Property Declaration – will auto-create a property shape for rdfs:label.
Clone property shapes from … – will let you select a class or a node shape from which to clone property shapes definitions.
You will be able to select the properties to clone.
Cloning creates copies of selected property shapes as blank nodes.
Derive property shapes from instances … – will let you select an asset collection that contains instance data for this shape.
It will examine the data and automatically create property shapes based on the data values.
Add property shapes from Spreadsheet columns … – will let you select a spreadsheet to use as an indicative example from which to create property definitions.
Add property shapes from Wikidata sample … – will let you identify Wikidata resource to use as an indicative example from which to create property definitions.
You will be able to select properties you want to use and modify their cardinalities and datatypes.
New property shapes will be created as resources using the standard property convention for URI creation.
Delete … – after confirmation, will delete the node shape.
It will also delete some associated items. Any property shapes will be deleted if they are identified using blank nodes.
Not available for node shapes included from another ontology.
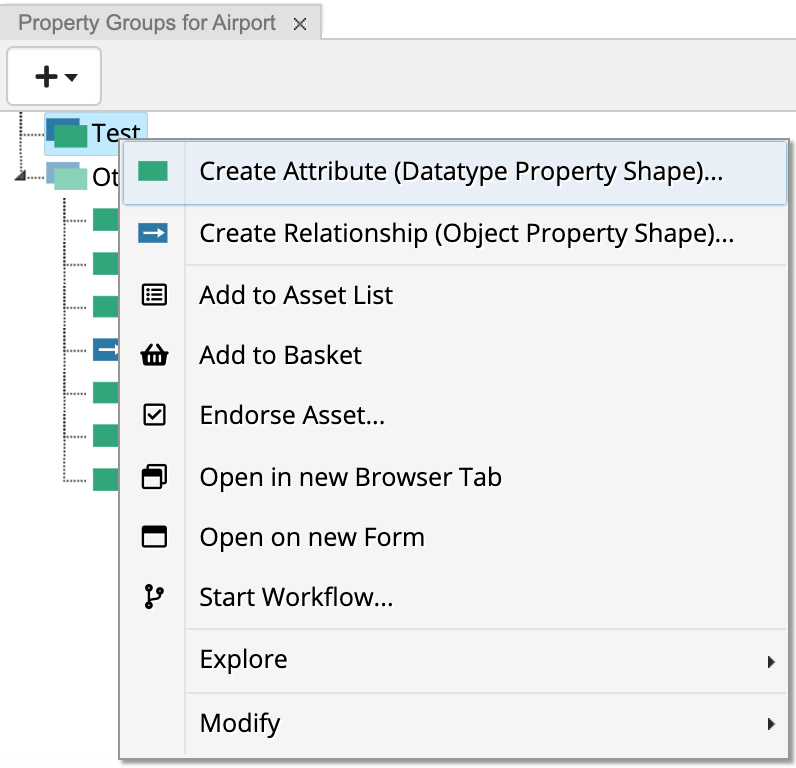
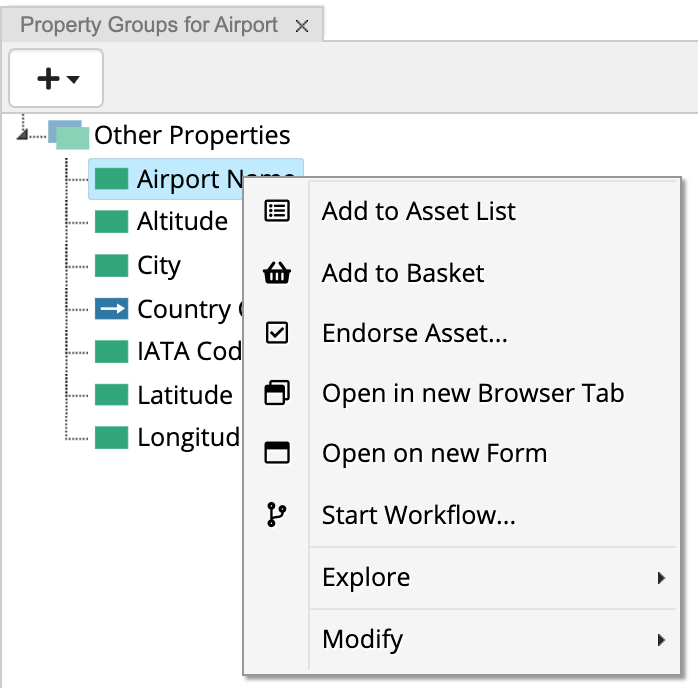
This panel will display properties associated with a selected class or a node shape.
Properties are displayed organized into groups, reflecting how they would be shown on a form.
If a property does not belong to any group, it will be shown under built-in Other Properties group.
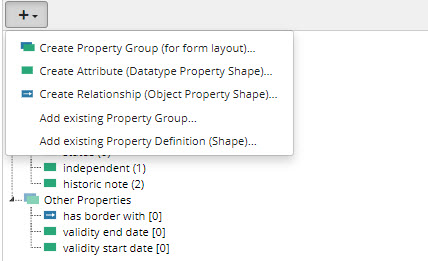
The panel lets you create new property definitions (for attributes and relationships) and new property groups.
Properties are associated with classes (or node shapes) using property shapes which define constraints on the property values.
It is possible to refer to the same property in multiple property shapes.
Thus, this panel actually displays property shapes – associations between properties and classes/node shapes.
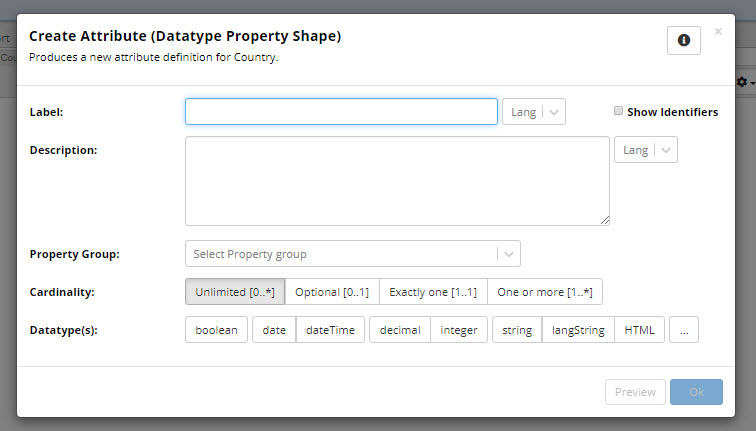
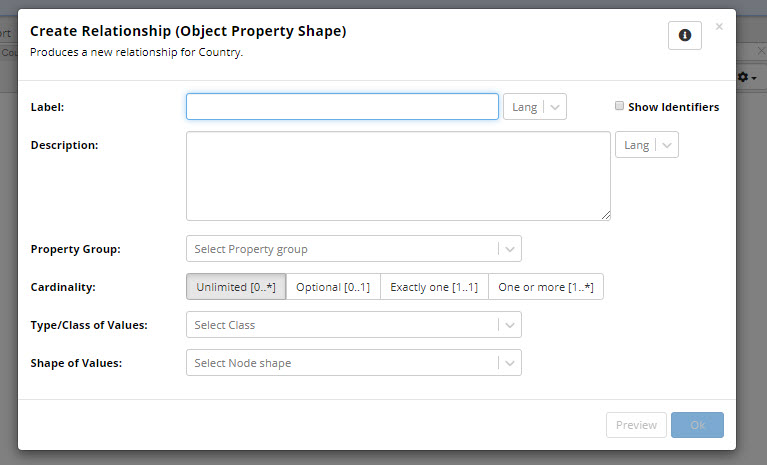
Create New dialogs will create a property shape, associating a property with the class/node-shape and containing value constraints.
It will refer to a property that will be used by data, but, by default, it will not create any statements about the property other than the reference in the shape.
If “Also create global OWL Properties” on the Manage tab is enabled, it will create a type statement for the property.
Alternatively, as described below, an existing property can be used to create a property shape.
The dialogs let you enter a name by which the property will be known in the context of the shape, its textual description and select its cardinality.
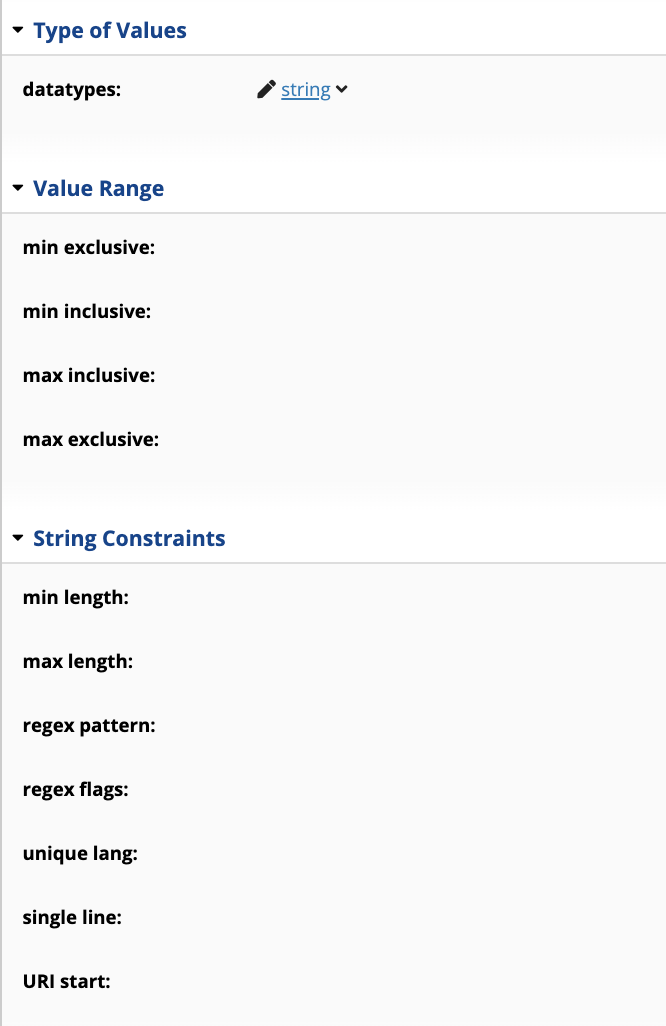
For attributes, you will also be able to select the datatype (e.g., string, integer).
Multiple datatypes can be selected.
One common combination is string and langString.
This leaves the choice of language tagging a value up to to the user that will enter data.
If you do not select a datatype, EDG will add a node-kind constraint indicating that the value is literal.
If you start the create process by selecting a property group, it will already be pre-selected in the dialog.
Otherwise, you can choose one from the drop down or leave the selection empty.
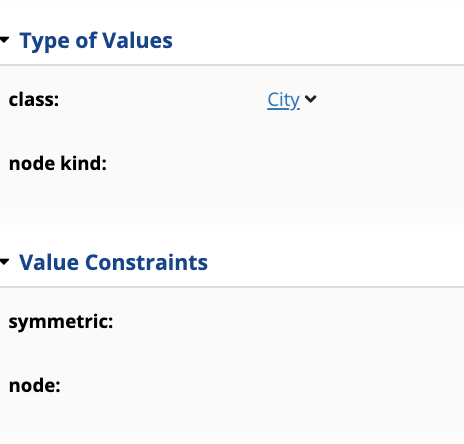
For relationships, you will also be able to select a class values should belong to and/or a node shape they should comply with.
Clicking on the “i” icon in the upper right corner of the dialog will provide a description and instructions for each field in the dialog.
By default, EDG will automatically generate a URI to uniquely identify the resource by combining the default namespace specified for the ontology on its creation (the default being “http://example.org/ontologies/<asset collection name>#”) with a user-entered label for the resource.
Any characters that would cause problems in a URI are converted.
When creating property shapes, URI of the class and the name specified in the create dialog will be used to create the URI for the property shape
To override the system generated URIs, check Show Identifiers checkbox.
The dialog will now show two new fields that can be updated:
ID/Path of Property
ID of Property Shape Definition
You can use these fields to override the generated URIs, to use URI of already existing property and to define properties that represent more complex connections between resources.
The latter is done by entering path expressions in the ID/Path of Property field.
The other two options in the Property Groups Panel let you add existing property group for use with your properties and add existing property shape to a selected class.
Adds selected group to a sharable asset list.
Asset lists are available in the Creating and Using Asset Lists and used for bookmarking or bulk actions.
Clone … – will clone the selected group.
All property shapes associated with the selected group will also be associated with the clone.
Merge … – will merge selected group with another group
Replace … – will replace selected group.
Delete – after confirmation, will delete the selected group.
Deleting a group will not impact any properties.
They will now be placed under the “catch all” Other Properties group
Clone … – will clone selected property shape. The label of the clone (preferred label in case of SKOS Concepts) will be set as the label of original asset with “ Copy” post-pended to it.
Merge … – will merge this property shape with another property shape
Replace … –Replace, creates a clone of the selected asset using URI that you will provide and then deletes selected asset.
One difference with the clone operation above is that the label will be the same as the label of the original asset, “ Copy” will not be post-pended.
You can use this operation if you decide that you need to modify URI identity of a resource.
EDG will automatically adjust all incoming and outgoing references.
However, it will do so only for the currently selected asset collection.
Other asset collections will not be updated.
If they contain references to the asset you are replacing, you will see broken links.
To understand possible impacts of delete operations see Deleting Assets section.
Create property value rule from template … – will let you create a calculation (inference) rule for property values.
Delete – after confirmation, will delete the selected shape.
Property values are not impacted.
Since asset collections in EDG can include each other by reference, some care needs to be taken when deleting assets.
Delete operation only deletes references to the deleted asset that exist in your current asset collection.
Deleting a property does not delete property values that are held in another asset collection.
Settings menu for this panel provides the following options:
Leave property groups closed – when checked property groups will be shown collapsed with the ability to expand them one by one
Show numeric order values – when checked, numeric order of a property within a group and the order of groups will be shown after the property name in parenthesis
Show defining shapes/classes – when checked, shape/class a property is associated with will be shown in parenthesis after its name and order value
See information in the Editing Assets using Form Panel (any asset) in the Editor documentation since most of the form options described for instances also apply to schema resources.
A few additional options are available when working with schema level resources.
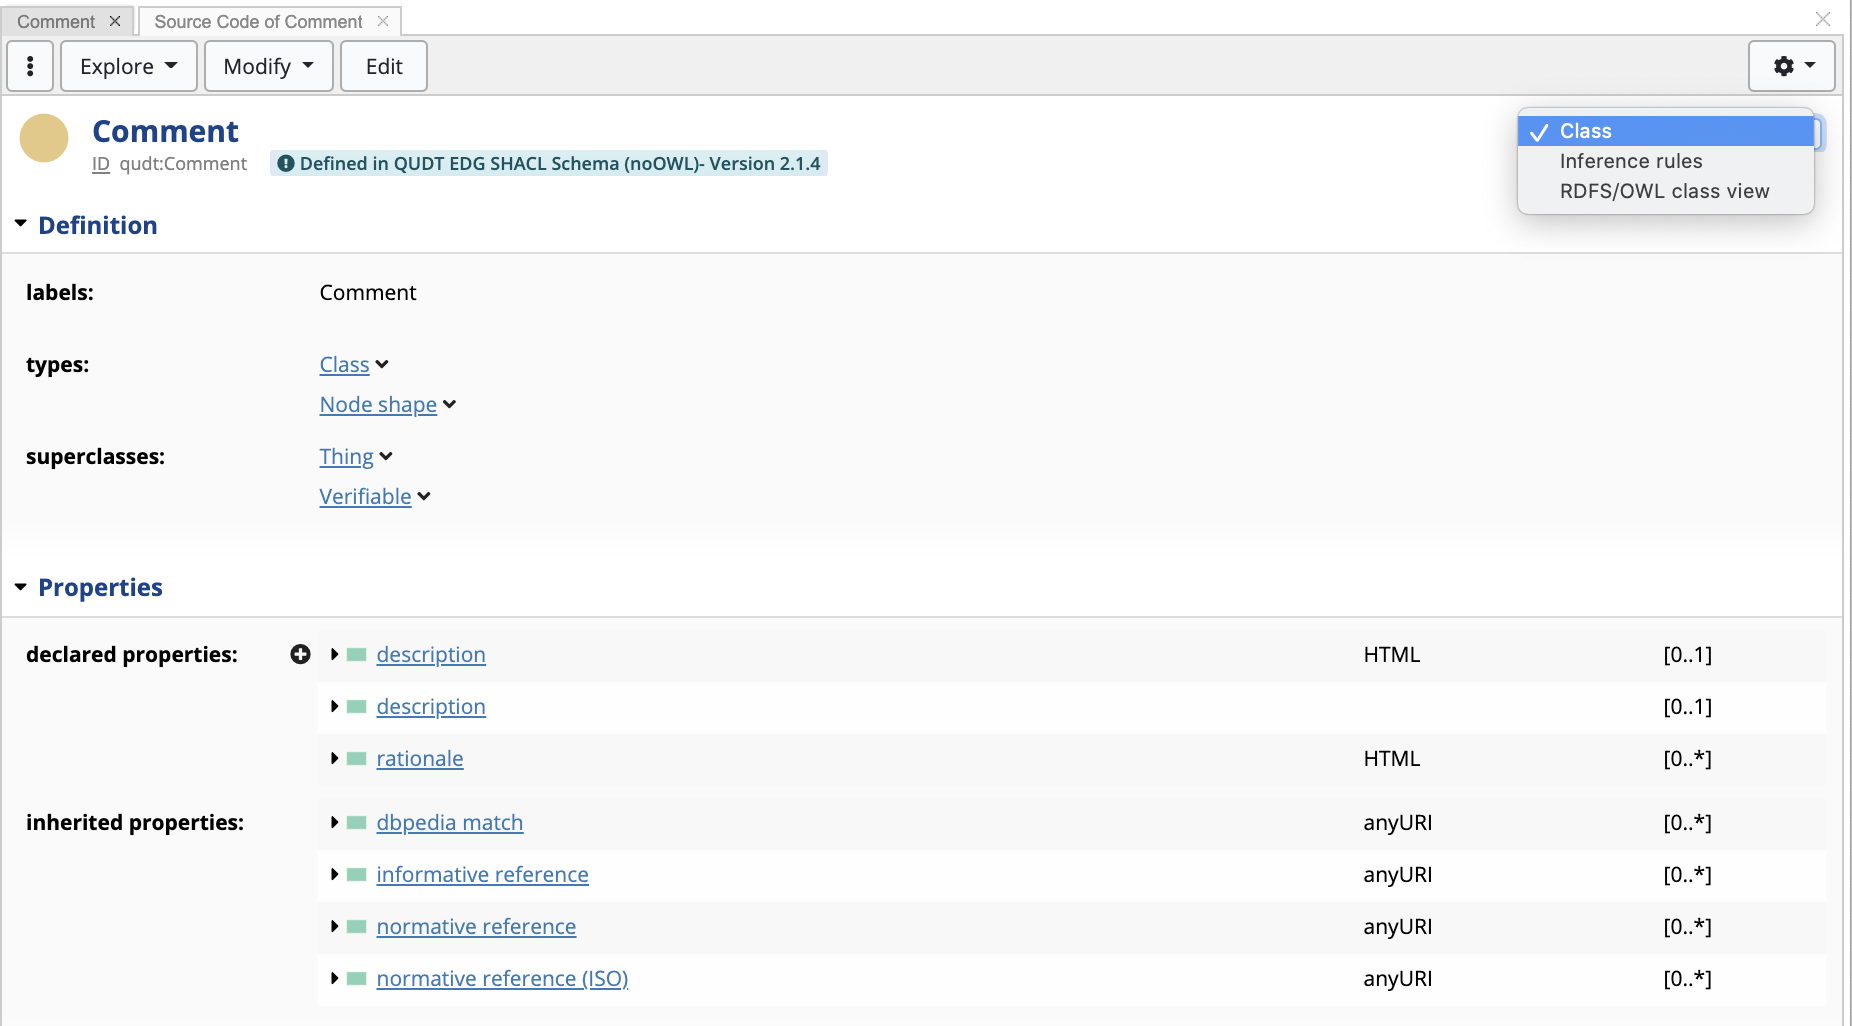
What is shown on the class form is defined by ontologies that describe classes – SHACL and OWL:
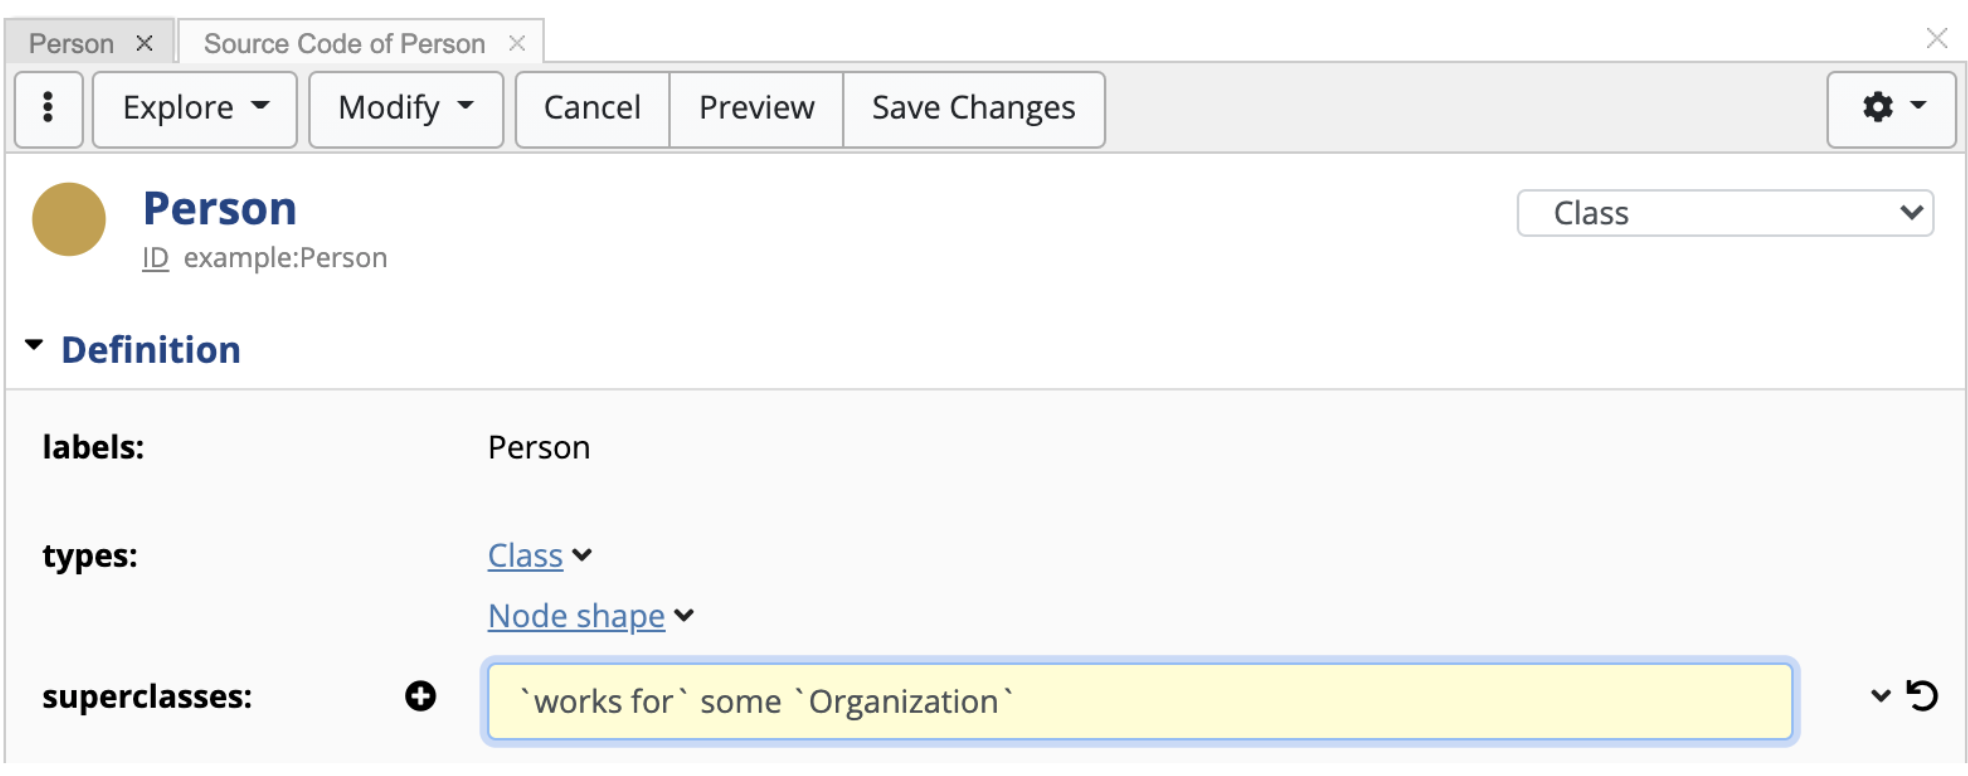
The traditional SHACL view lets you, in addition to a label and rdfs:comment” create rdfs:subClassOf statements and, if a class is also a SHACL Node Shape, add SHACL definitions e.g., specify using SHACL what properties are anticipated for class members and what their values might be.
RDFS/OWL view of a class lets you, in addition to a label and rdfs:comment and rdfs:subClassOf statements, specify what properties have the class in their domain or range and to enter a number of other OWL axioms – as shown in one of the screenshots below.
You can modify what is shown on the form for a class.
This is done, as typical in EDG, through ontology modeling.
Switch to the Node Shapes panel, select, for example, RDFS/OWL Class View Node Shape and add any property you want to appear on a class form.
For classes you will be able to:
Define a class as abstract – no instances can be created
Define a class as hidden – it will not be presented in the Class Hierarchy panel, in the Asset Navigator in the Search panel or in other places where classes a selected e.g., when creating a new Asset.
Use Manchester syntax when editing certain properties.
Note
In this syntax you need to surround property and class names using the ` character (not the plain ‘ apostrophe).
While this feature is available, EDG is optimized for using SHACL and we recommend that the models are defined in SHACL.
SHACL shapes are created automatically when you create new properties.
For node shapes, including node shapes that are also classes, you will be able to:
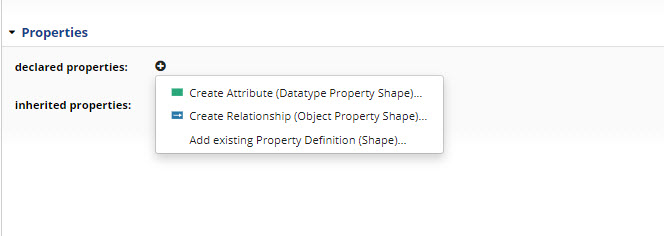
See associated properties displayed in a table on the form and add a new property by clicking on the “+” icon next the “declared properties” field – as shown in the screenshot below.
Create associated properties by cloning them from another class or a node shape by selecting an option under the Modify menu.
Use sample data from another asset collection to create property shapes – an option under Modify menu.
Use sample data from Wikidata to create property shapes – an option under Modify menu.
Use spreadsheet data to create property shapes – an option under Modify menu.
Set targets – this is available only for Node Shapes that are not classes.
Set a node shape as a default view for all user roles or for a subset of roles. If nothing is set, then the default view for members of a class is a node shape that is also a class.
Add label property declaration – autogenerate a property shape for rdfs:label path
Deactivating Property Shapes Deactivating a shape means that the field will not appear on a form, it will not be available for GraphQL query and no data validation will be performed for its values.
Hide a property. It will no longer appear on a form, but it will be available for GraphQL query and its values will be validated
Mark a property as “read only”.
In this case, users will not be able to change it in the form.
However, if they have access to source code editing, they will still be able to modify it.
Update a property group, a property belongs to and its order within the group.
If no group is selected, then a property will be displayed under the default Other Properties section on a form
Change the order of appearance of a property within a group.
If no order is selected, then properties are presented in the alphanumeric order of their labels.
Order is numeric and can contain fractional numbers e.g., 1.05 will be displayed after 1.02.
Specify GraphQL field name – only needed if the property label contains characters that are illegal in GraphQL i.e.,hyphens ( – ).
Otherwise, the field name is auto-generated if this value is left empty.
Select View and Edit widgets for property values.
Typically, this is not necessary as EDG will auto-select the most appropriate widget based on the datatype for literal values.
For relationships, the widget will be standard autocomplete.
However, some specialized widgets are also available. See the documentation at DASH Widgets
Add a display name and description for a property field on a form.
If a name and/or description exist for both, RDF/OWL property and a property shape, property shape values take precedence.
Add and modify property value constraints.
Available constrain differs for attributes (properties with the literal values) and relationships
Change the datatype of the property values across graphs – an option under Modify menu.
This option will let you select graphs that you want to modify.
This is typically done if you are planning to change the datatype constraint for a property e.g., from an integer to a string.
You will want to first update data and then change the property
Delete property values across graphs – an option under Modify menu.
This option will let you select graphs that you want to modify.
This is typically done if you are planning to remove the property.
You will want to first delete data and then remove property definition
Replace property across graphs – an option under Modify menu.
This option will let you select graphs that you want to modify.
You will also select another property.
This is typically done if you are planning to remove the property, but you don’t want to loose the values.
Instead, you want to give the values to another property.
Generate an inverse shape – only available for a relationship – an option under Modify menu.
Create a property value rule from a template – an option under Modify menu (see Working with Rules).
Set a custom icon for the user interface.
Properties marked with the property role ‘dash:IconRole’ produce images that may be displayed in the upper left corner of a focus node’s display, or to the left of a label in a tree display.
Instances of the same class often have the same icon, and this icon may be computed using a sh:values rule or via sh:defaultValue.
See Custom Icons for Assets.
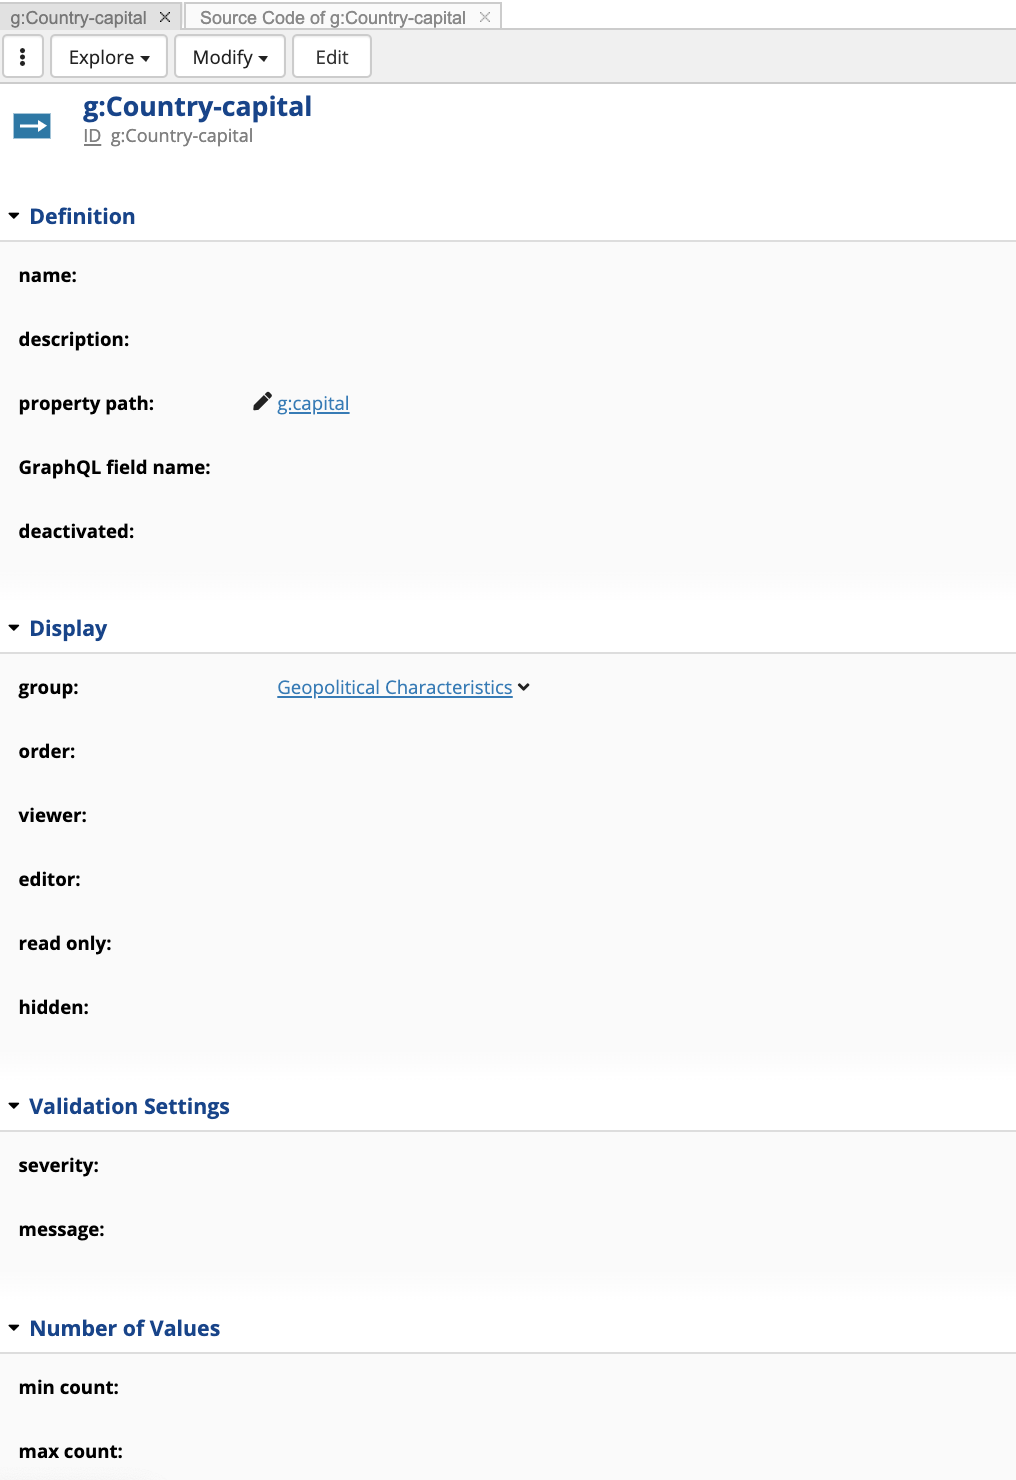
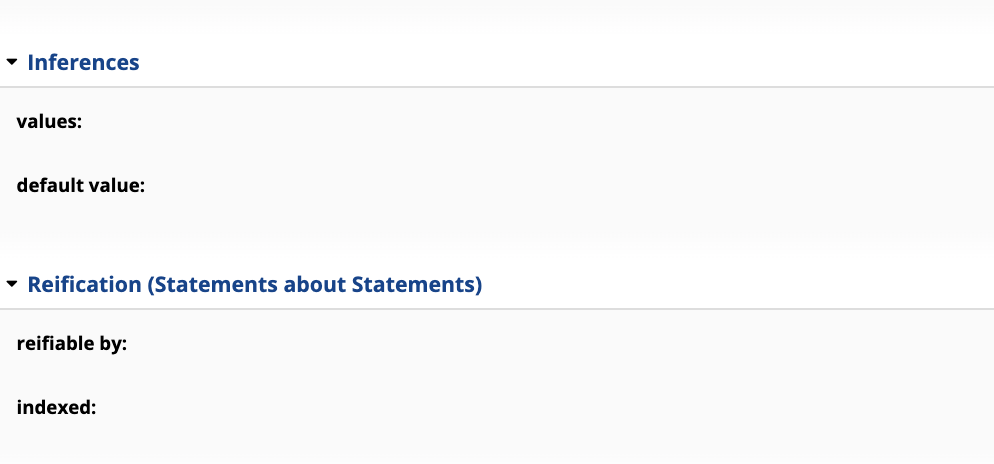
Options you will see on the forms for property shapes will depend on the type of a property – attribute or relationship.
Common options are displayed on the screenshots below.
Not all constraints can currently be defined using Forms.
For some constraints (e.g Logical constraint components), you will need to use the Source Code panel.
Sometimes you may need to add your own properties to the forms for schema resources e.g., classes and properties.
These forms are predefined with the pre-determined selection of form sections and fields.
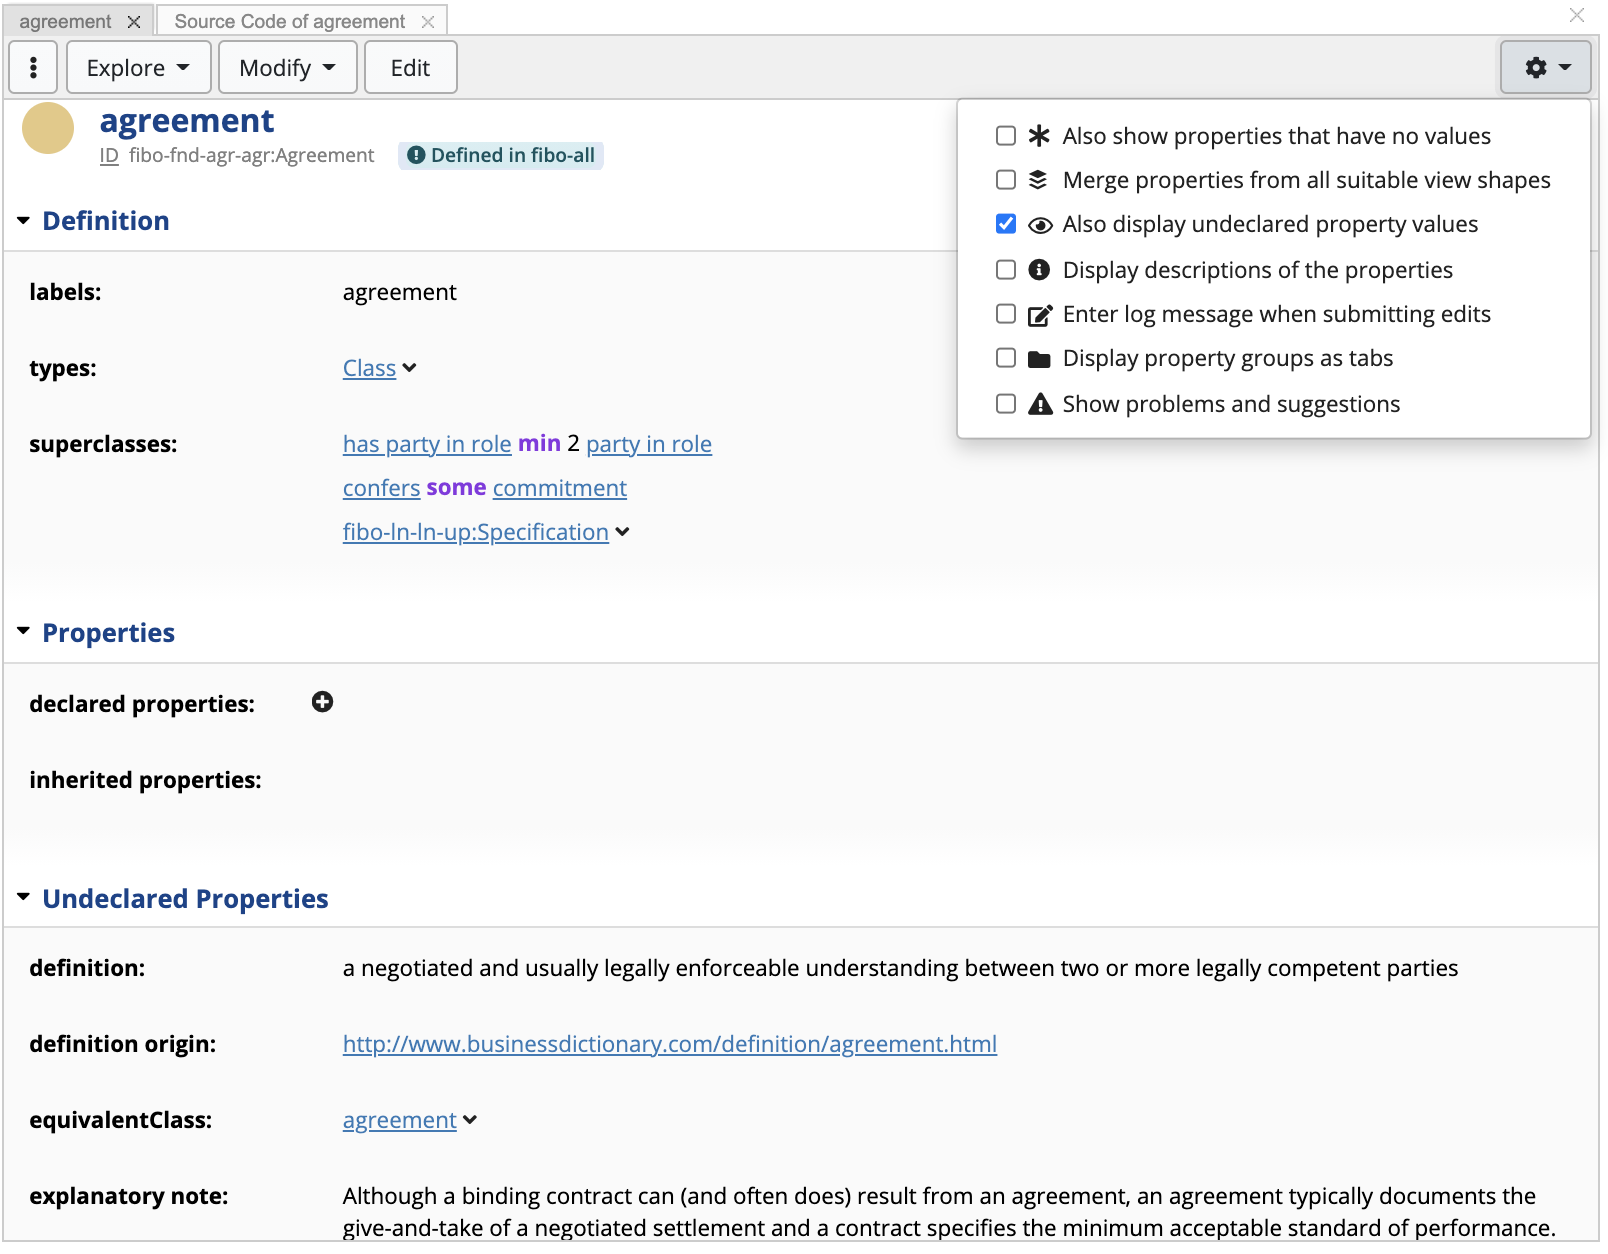
By default, you will see a field for the label (rdfs:label) and comment (rdfs:comment).
You may load an ontology that uses additional properties to capture other information for let’s say classes.
To see this information on the form, select Also display undeclared property values from the Settings menu on the form.
With this option selected, EDG will show all available information on the form, including values of such “undeclared” properties.
You will be able to see these values, but you will not be able edit them since EDG does not know what type of values they should be.
If you need to enter these additional values and not simply see them, you can customize the forms for schema resources by going to either a class
(e.g., sh:PropertyShape) or, if multiple views have been defined, a node shape that defines a view.
For example:
Navigate to rdfs:Class or owl:Class which define the default view on a class.
You may need to press the Switch the root class button on the top of the Class Hierarchy Panel to
see those system classes, as they directly inherit from rdfs:Resource, not owl:Thing.
Add new property shapes as needed
For property shapes, you need to locate tosh:PropertyShapeView and/or its two sub-shapes for datatype or object properties.
Then add property definitions to those view shapes.
This panel is a table showing all instances of a class selected in another panel e.g., Class Hierarchy panel.
New button lets you create new instances.
While this panel is available in different editors, the main use of it is in the Ontology Editor where Search Results panel with its richer capabilities for working with instances is not available.
Note
While you could create an instance directly in an ontology, ontologies in EDG are not intended for working with instances.
When you create an instance directly in an ontology, you will only be able to create and edit its label and comment information.
This panel is a table showing instances of rdf:Property class and its subclasses.
New button lets you create new properties.
The main use of the panel is to find properties that do not participate in property shapes.
Creating a property in this panel will not create a property shape.